
Shirley Jackson’s We Have Always Lived in the Castle is a haunting tale of isolation, family secrets, and psychological intrigue, exploring themes of loneliness and madness.
1.1 Overview of the Novel

We Have Always Lived in the Castle is a gothic novel by Shirley Jackson, centered on the isolated Blackwood family. The story, narrated by Merricat, explores themes of isolation, family secrets, and psychological tension. The Blackwoods live in a crumbling mansion, ostracized by their village due to a tragic family history. The arrival of Cousin Charles disrupts their fragile existence, leading to a climactic confrontation. The novel delves into madness, guilt, and the blurred lines between reality and fantasy, creating a haunting atmosphere of suspense and intrigue.
1.2 Author Background: Shirley Jackson
Shirley Jackson was a prominent American author known for her contributions to horror and mystery genres. Born in 1916, she gained fame with works like The Lottery and The Haunting of Hill House. Jackson’s writing often explored themes of isolation, psychological complexity, and the darker aspects of human nature. Her unique style blended subtle suspense with deep character analysis, influencing many writers. Despite her untimely death in 1965, Jackson’s legacy endures, with We Have Always Lived in the Castle remaining a celebrated masterpiece of gothic literature.
1.3 Historical Context of the Novel
We Have Always Lived in the Castle was written during the 1960s, a time of social change and cultural shifts in America. The novel reflects post-war anxieties, exploring themes of isolation and societal judgment. Shirley Jackson drew inspiration from the era’s tensions, crafting a story that critiques small-town mentality and the fear of the unknown. The historical context adds depth to the Blackwood family’s estrangement, mirroring broader societal issues of the time. This backdrop enhances the novel’s eerie atmosphere and its exploration of human psychology.
Plot Summary
The story follows the isolated Blackwood family, focusing on Merricat, Constance, and Uncle Julian. The arrival of Cousin Charles disrupts their fragile peace, leading to tragedy and isolation.
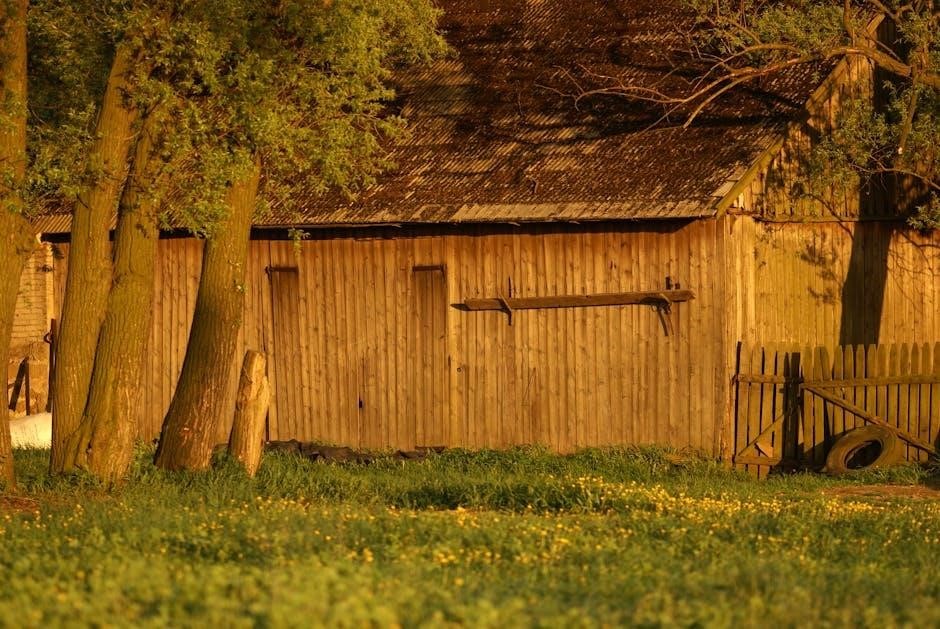
2.1 Setting: The Isolated Castle
The novel is set in an isolated, decaying castle on the outskirts of a rural village. The castle serves as a symbolic refuge for the Blackwood family, emphasizing their estrangement from society. Its crumbling structure mirrors the family’s internal disintegration and the weight of their dark past. The isolated setting heightens the sense of claustrophobia and tension, trapping the characters in a world of secrets and madness. This physical isolation also underscores the emotional detachment of the family members from the outside world and each other.
2.2 Main Characters: Merricat, Constance, and Uncle Julian
Merricat Blackwood is the novel’s narrator, a fiercely protective and eccentric young woman who clings to her family’s isolation. Constance, her older sister, is practical and nurturing, shouldering the responsibility of their household. Uncle Julian, a mentally unstable historian, obsesses over the family’s tragic past. Together, they form a tight-knit yet dysfunctional unit, bound by shared secrets and isolation. Each character’s unique perspective shapes the narrative, revealing their complex relationships and the dark history that haunts them.
2.3 The Arrival of Cousin Charles
The arrival of Cousin Charles disrupts the isolated routine of the Blackwood sisters. Charles, a distant relative, brings an air of tension and manipulation, exploiting the family’s vulnerabilities. His presence challenges Merricat’s protective nature and Constance’s nurturing role, stirring long-buried conflicts. Charles’s ulterior motives and charming facade create friction, particularly with Merricat, who views him as a threat to their fragile stability. His arrival marks a turning point, accelerating the unraveling of the family’s secretive and isolated existence.
2.4 Climax and Resolution
The climax unfolds as the villagers, driven by suspicion and resentment, attack the Blackwood house. Merricat and Constance face the chaos, leading to the destruction of their home and the shattering of their isolated world. In the resolution, the sisters rebuild their lives amid the ruins, embracing their newfound freedom. Merricat and Constance find strength in each other, accepting their reality and forging a path forward. The novel concludes with a sense of resilience, as the sisters adapt to their changed circumstances, highlighting themes of survival and the enduring power of sibling bonds.
Major Themes
The novel explores themes of isolation, family secrets, madness, and guilt, delving into the complexities of human psychology and societal judgment through its haunting narrative.
3.1 Isolation and Loneliness
In We Have Always Lived in the Castle, isolation and loneliness are central themes. The Blackwood family resides in a remote, dilapidated castle, estranged from the outside world. Their physical isolation mirrors their emotional detachment, as they struggle to connect with each other and society. The village’s hostility exacerbates their loneliness, forcing them into a self-imposed exile. Merricat’s narrative voice captures the intensity of their isolation, reflecting both a protective shield and a source of deep sorrow. This theme underscores the psychological effects of prolonged solitude and societal rejection, creating a haunting atmosphere of disconnection and despair.

3.2 Family Dynamics and Secrets
The Blackwood family’s dysfunctional relationships are shaped by secrecy and isolation. Merricat, the youngest, uses magic to cope with their estrangement, while Constance, the eldest, shoulders the burden of caregiving. Uncle Julian’s obsession with the past reveals the family’s unresolved trauma. The novel explores how secrets, both kept and revealed, distort relationships and perpetuate isolation. The Blackwoods’ inability to confront their past fosters a toxic environment where guilt, blame, and silence reign. Their dynamics illustrate the destructive power of unaddressed secrets and the fragility of familial bonds in the face of tragedy and societal judgment.
3.3 Madness and Reality
The novel explores the thin line between madness and reality through its characters’ perceptions and experiences. Merricat’s narration often blurs the boundaries of what is real and what is imagined, reflecting her isolated worldview. Uncle Julian’s fixation on the past and his fragmented memories illustrate the impact of trauma on mental stability. Meanwhile, the villagers’ fear and suspicion of the Blackwood family further distort their view of reality. The novel raises questions about the nature of sanity and how isolation can amplify the perception of madness, leaving ambiguity about what is truly real.
3.4 Guilt and Responsibility
Guilt and responsibility are central themes in the novel, as the Blackwood family grapples with the consequences of past actions. Merricat and Constance live under the shadow of their family’s dark history, with their isolation serving as both a shield and a reminder of their perceived guilt. Uncle Julian’s obsessive recounting of events highlights the burden of responsibility and the lasting impact of unresolved guilt. The villagers’ accusatory attitudes further compound the family’s internal struggles, creating a cycle of blame and self-recrimination that shapes their lives and interactions.

Character Analysis
The novel delves into complex characters, exploring their psychological depths and relationships. Merricat’s dark charm, Constance’s nurturing nature, Uncle Julian’s tragic obsession, and Charles’s manipulative presence shape the story.
4.1 Merricat Blackwood: The Unreliable Narrator
Merricat Blackwood, the novel’s narrator, presents a unique yet skewed perspective of events. Her dark, imaginative worldview often distorts reality, making her an unreliable guide. Through her eyes, the reader experiences the isolated Blackwood family’s strange dynamics and the oppressive village outside. Merricat’s narration is laced with magical thinking and a deep sense of protectiveness toward her sister Constance. Her unreliability challenges readers to question the truth behind the family’s tragic history and their current circumstances, adding layers of mystery to the story. This narrative technique heightens the novel’s eerie atmosphere and psychological depth.
4.2 Constance Blackwood: The Protective Sister
Constance Blackwood emerges as a figure of quiet strength and maternal care, despite her reclusive existence. Her primary role is to protect Merricat and Uncle Julian, maintaining a fragile sense of normalcy within their isolated world. Constance’s gentle demeanor contrasts with the darkness of their family’s past, showcasing her resilience. Her unwavering dedication to her siblings highlights themes of loyalty and sacrifice, while her internalized guilt reflects the weight of their shared history. Constance’s character serves as a stabilizing force, balancing the chaos that surrounds them, and her actions are driven by a deep-seated need to preserve what little stability they have. Her protective nature is both a source of strength and a burden, underscoring the complexities of her role within the family. Through her, Jackson explores the enduring power of familial bonds and the sacrifices made to uphold them.
4.3 Uncle Julian: The Tormented Historian
Uncle Julian, a wheelchair-bound historian, is trapped in a world of delusions and obsession with the past. His fragile mental state and dependence on Constance for care highlight his vulnerability. Julian’s fixation on historical events and his own family’s dark history adds to the novel’s eerie atmosphere. His character serves as a reminder of the lingering consequences of past traumas. Despite his instability, Julian’s insights occasionally reveal a profound understanding of the family’s situation, making him a complex and tragic figure. His presence underscores the themes of isolation and the weight of history.
4.4 Charles Blackwood: The Disruptive Cousin
Charles Blackwood, the manipulative cousin, disrupts the fragile equilibrium of the Blackwood family. His arrival at the isolated estate brings tension, as his motives are driven by self-interest. Charles seeks to exploit the family’s wealth and secrets, creating conflict, particularly with Merricat, who distrusts him deeply. His presence accelerates the unraveling of the family’s protective isolation, leading to dramatic consequences. Charles’s character represents the intrusive force that challenges the sisters’ fragile stability, highlighting themes of intrusion and the fragility of their secluded world.

Symbolism in the Novel
The castle symbolizes isolation, the village represents society, the cat embodies comfort, and the teacup signifies fragility, emphasizing their disturbed world.
5.1 The Castle as a Symbol of Isolation
The castle in Shirley Jackson’s We Have Always Lived in the Castle serves as a potent symbol of isolation, both physically and emotionally. Its towering structure and gated perimeter create a barrier between the Blackwood family and the outside world, reflecting their estrangement from society. The castle’s grandeur contrasts with the family’s internal decay, symbolizing their disconnection from reality. Merricat’s rituals and Constance’s confinement within its walls highlight their inability to escape their isolated existence, while Uncle Julian’s obsessive recollections underscore the castle’s role as a prison of memories and guilt. The castle’s faded beauty mirrors the family’s entrapment in their own dark past, emphasizing their inability to connect with the world beyond their gates.
5.2 The Village as a Symbol of Society

The village in We Have Always Lived in the Castle represents the oppressive nature of societal judgment and fear. Its residents’ hostility towards the Blackwood family reflects widespread prejudice and misunderstanding. The village’s uniform rejection of the Blackwoods mirrors the way society often marginalizes those perceived as different. This collective animosity creates a barrier between the family and the outside world, reinforcing their isolation. The villagers’ violent actions, such as the final attack on the castle, symbolize society’s tendency to destroy what it fears, further isolating the Blackwoods and solidifying their alienation from the community.
5.3 The Cat as a Symbol of Comfort
In We Have Always Lived in the Castle, the cat serves as a symbol of comfort and companionship, offering solace to Merricat in her isolated world. The cat’s presence provides a sense of normalcy and routine, contrasting the family’s dark past and the villagers’ hostility. Merricat’s bond with the cat highlights her deep need for connection, even as she struggles with her own reality. The cat’s role underscores the theme of seeking comfort in small, familiar things amidst overwhelming isolation and uncertainty, making it a poignant symbol of resilience and quiet companionship.
5.4 The Teacup as a Symbol of Fragility
The teacup in We Have Always Lived in the Castle symbolizes fragility and vulnerability, particularly reflecting Constance’s delicate emotional state. Its dainty appearance mirrors the family’s precarious existence, teetering on the edge of collapse. The teacup’s significance is heightened during tense moments, such as Charles’s arrival, where its potential shattering foreshadows impending chaos. Ultimately, the teacup’s destruction serves as a turning point, symbolizing the irreversible breakdown of the family’s fragile peace. This object embodies the novel’s themes of vulnerability and the disintegration of order in a world fraught with tension and despair.
Writing Style and Narrative Techniques

Shirley Jackson’s writing in We Have Always Lived in the Castle is masterful, blending a haunting, atmospheric narrative with precise language to create a unique, suspenseful tone. The first-person perspective of Merricat Blackwood adds depth, while Jackson’s use of imagery and dialogue skillfully builds tension, immersing readers in the eerie world of the Blackwood family.
6.1 First-Person Narrative
The novel is told through Merricat Blackwood’s first-person perspective, creating an intimate yet unreliable narration. Her unique voice immerses readers in the Blackwood family’s isolated world, blending naive charm with darker undertones. The first-person narrative limits the reader’s understanding to Merricat’s perceptions, heightening suspense and ambiguity. Jackson’s use of this technique masterfully conceals truths, forcing readers to piece together reality alongside Merricat. This narrative choice underscores themes of isolation and madness, as Merricat’s distorted view of the world reflects her own psychological state and the family’s fractured dynamics.
6.2 Use of Imagery and Atmosphere
Shirley Jackson masterfully employs vivid imagery to craft a haunting atmosphere in We Have Always Lived in the Castle. The isolated Blackwood house, with its overgrown garden and decaying interiors, serves as a visual metaphor for the family’s internal decay. Imagery of shadows, dust, and crumbling structures reinforces the novel’s eerie tone, while descriptions of the surrounding village create a sense of foreboding. The contrast between the castle’s isolation and the village’s hostility heightens tension, immersing readers in a world of suspense and psychological complexity. Jackson’s imagery underscores the themes of isolation and madness, enveloping the narrative in an unsettling mood.
6.3 Dialogue and Character Development
Dialogue in We Have Always Lived in the Castle plays a crucial role in shaping character dynamics and advancing the plot. Merricat’s darkly imaginative speech reflects her isolated worldview, while Constance’s gentle exchanges reveal her nurturing nature. Uncle Julian’s fragmented monologues about the past highlight his mental instability. The arrival of Cousin Charles disrupts the siblings’ harmony, as his manipulative dialogue exposes underlying tensions. Through these interactions, Jackson masterfully reveals character motivations and deepens the sense of foreboding, using dialogue to explore themes of isolation and family dysfunction. The conversations also underscore the characters’ psychological complexities, adding layers to the narrative.
6.4 Foreshadowing and Suspense
Shirley Jackson masterfully employs foreshadowing and suspense in We Have Always Lived in the Castle, creating an eerie and tense atmosphere. Merricat’s cryptic warnings and the villagers’ hostility hint at the tragic events that unfold. The isolated castle and its decaying surroundings amplify the sense of impending doom. Jackson’s use of subtle omens, such as the broken teacup and the arrival of Cousin Charles, builds tension and forebodes the climax. The suspense is heightened by the slow revelation of family secrets, keeping readers engaged and invested in the unfolding drama.
Critical Reception and Reviews
Initially met with mixed reviews in 1962, the novel has since gained acclaim for its dark, atmospheric storytelling and exploration of isolation and madness, solidifying its place in Gothic literature.
7.1 Initial Reception in 1962
Upon its release in 1962, We Have Always Lived in the Castle received mixed reviews. Some critics praised its dark, atmospheric storytelling and exploration of isolation, while others found it unsettling and difficult to categorize. The novel’s unconventional narrative style and themes of madness and family dysfunction challenged readers, leading to polarized opinions. Despite this, Shirley Jackson’s mastery of psychological tension was widely acknowledged. The mixed reception reflected the era’s literary preferences, with some critics struggling to appreciate its unique blend of Gothic elements and subtle horror. Over time, however, the novel has been reevaluated and celebrated for its originality.
7.2 Modern Critical Analysis
Modern critics have reevaluated We Have Always Lived in the Castle, praising its nuanced exploration of isolation, family dynamics, and psychological complexity. The novel is now widely regarded as a masterpiece of Gothic literature, with scholars highlighting its themes of loneliness, guilt, and the blurred lines between madness and reality. Feminist critics have also explored the roles of Merricat and Constance, emphasizing their resilience and the societal pressures they face. The novel’s atmospheric prose and Jackson’s mastery of suspense continue to captivate readers, solidifying its place as a cornerstone of modern literary analysis and dark storytelling.
7.3 Comparisons with Other Works by Shirley Jackson
Shirley Jackson’s We Have Always Lived in the Castle shares thematic similarities with her other works, such as The Lottery and The Haunting of Hill House. Both explore isolation, psychological tension, and the darker aspects of human nature. However, the novel’s focus on family dynamics and madness sets it apart. Like her other works, it features Jackson’s signature concise prose and atmospheric settings, yet the tone here is more intimate and deeply personal, reflecting her ability to craft unique narratives while maintaining her distinctive style and thematic preoccupations.
7.4 Impact on Gothic Literature
We Have Always Lived in the Castle is a cornerstone of modern Gothic literature, blending psychological complexity with traditional Gothic elements. Its exploration of isolation, madness, and family secrets has influenced countless authors, reshaping the genre. Jackson’s mastery of atmosphere and subtle horror has inspired contemporary Gothic writers to focus on inner turmoil and the unsettling aspects of domestic life. The novel’s enduring popularity highlights its significance in redefining Gothic storytelling, making it a timeless classic that continues to captivate readers and scholars alike.
Study Guide and Essay Topics
Explore essay topics like family dynamics, isolation, and moral responsibility. Study guides offer insights into characters, themes, and Shirley Jackson’s unique storytelling style for deeper analysis.
8.1 Essay 1: Family as the Cause of Problems
Discuss how the Blackwood family’s internal dynamics and past tragedies contribute to their isolation and conflicts. Analyze how their dysfunctional relationships and secrets lead to the novel’s dark events. Consider Merricat’s role in protecting her family and the impact of Cousin Charles’s arrival. Explore how family loyalty, guilt, and unresolved tensions create a toxic environment. Use specific examples to argue whether the family’s problems stem from internal flaws or external pressures. This essay topic encourages a deep exploration of the novel’s themes of family dysfunction and its consequences.
8.2 Essay 2: Safety vs. Freedom
Explore the tension between safety and freedom in the Blackwood sisters’ isolated existence. Analyze how their confined life in the castle provides a sense of security but limits their opportunities for connection and growth. Consider how Merricat and Constance view their isolation differently and the sacrifices they make to maintain their protected world. Discuss the impact of Cousin Charles’s arrival on their perception of safety and freedom. Use textual evidence to argue whether their isolation is a necessary refuge or a restrictive prison. This essay encourages an examination of the novel’s portrayal of confinement and liberation.

8.3 Essay 3: Merricat’s Perception of Reality
Examine how Merricat’s isolated upbringing shapes her unique view of the world. Discuss her role as an unreliable narrator and how her perceptions of reality are influenced by family secrets and isolation. Analyze her use of magic and superstition as coping mechanisms, as well as her interpretations of events like Charles’s arrival. Consider how her reality contrasts with external perspectives and the implications of her fragmented understanding of the past. Use textual evidence to explore whether her perception is a form of self-protection or a distortion of truth, highlighting her complexity as a character.
8.4 Essay 4: The Role of Guilt in the Novel
Explore the pervasive theme of guilt in We Have Always Lived in the Castle. Analyze how characters like Constance, Merricat, and Uncle Julian grapple with guilt tied to the family tragedy. Discuss how guilt shapes their actions, relationships, and isolation. Examine the moral responsibility each character bears and how it influences their identities. Consider the psychological impact of unresolved guilt and its role in the novel’s dark, introspective tone. Use specific examples to illustrate how guilt drives the plot and characters, ultimately reflecting the novel’s exploration of accountability and redemption.

PDF Version and Accessibility
The PDF version of We Have Always Lived in the Castle offers convenient accessibility, allowing readers to easily navigate and study the text. It is widely available online, providing students and researchers with a portable format for analysis. The PDF enhances readability and retains the novel’s original formatting, making it ideal for academic purposes and personal reading; Its digital accessibility ensures the story remains reachable to a broad audience, preserving its timeless appeal.
9.1 Benefits of the PDF Format
The PDF format of We Have Always Lived in the Castle provides numerous benefits, including portability and accessibility. It allows readers to access the novel from various devices, ensuring convenience for both academic and personal use. The PDF preserves the original formatting, maintaining the author’s intended structure and enhancing readability. Additionally, it enables easy highlighting and annotation, making it an invaluable resource for students and researchers. This digital version ensures that Shirley Jackson’s masterpiece remains accessible and engaging for modern audiences, facilitating deeper understanding and analysis of the text.
9.2 Where to Find the PDF
The PDF version of We Have Always Lived in the Castle can be accessed through various online platforms, including academic databases, e-book retailers, and educational websites. Popular sources like LitCharts, Google Books, and online libraries often provide downloadable versions. Additionally, websites such as Studocu and LibGuides offer free summaries and study guides. However, always ensure that the source is reputable and adheres to copyright laws. Purchasing from official retailers or accessing through subscription services is recommended for legal and ethical access to the novel in PDF format.
9.3 Legal and Ethical Considerations
Accessing We Have Always Lived in the Castle in PDF form requires adherence to copyright laws. Downloading or sharing pirated copies is illegal and undermines authors’ rights. Ensure that the PDF is obtained from legitimate sources like official publishers, e-bookstores, or academic platforms with proper licensing. Ethical considerations also involve respecting intellectual property and supporting authors by purchasing their work legally. Always verify the authenticity and legality of the source to avoid copyright infringement and promote fair practices in accessing literary works.
9.4 Advantages for Students and Researchers
The PDF version of We Have Always Lived in the Castle offers numerous advantages for students and researchers. It provides easy access to the text for close reading and analysis. The digital format allows for efficient searching, highlighting, and annotating, making it ideal for academic work. Researchers can quickly locate specific themes or quotes, while students can engage deeply with the narrative. Additionally, the PDF is portable and accessible across devices, facilitating study in various settings. This format supports comprehensive literary analysis and enhances the learning experience for both students and scholars.
Shirley Jackson’s We Have Always Lived in the Castle is a timeless exploration of isolation and family secrets. Its haunting narrative resonates deeply, making it a crucial read in Gothic literature. The PDF version offers accessibility, ensuring its themes and intrigue reach modern readers, encouraging further exploration and appreciation of this classic tale.
10.1 Final Thoughts on the Novel
We Have Always Lived in the Castle is a masterful blend of psychological depth and atmospheric tension. Shirley Jackson crafts a story that lingers long after the final page, inviting readers to reflect on its themes of isolation, guilt, and the fragility of the human psyche. The novel’s enduring popularity is a testament to its ability to captivate and unsettle, ensuring its place as a cornerstone of Gothic literature. The PDF version enhances accessibility, allowing new generations to discover its haunting beauty.
10.2 Relevance in Modern Literature
We Have Always Lived in the Castle remains a significant work in modern literature, offering insights into themes of isolation, family dynamics, and psychological complexity. Its exploration of guilt and reality resonates with contemporary readers, making it a staple in Gothic and psychological fiction. The novel’s enduring appeal lies in its ability to provoke thought on societal norms and individual identity. Its influence is evident in modern literature, and its availability in PDF format ensures accessibility for new generations of readers and scholars, solidifying its place in literary discourse.
10.3 Encouragement to Read the Novel
Reading We Have Always Lived in the Castle offers a unique glimpse into a world of psychological complexity and dark beauty. Its intricate characters, particularly Merricat, captivate readers with their depth and mystery. The novel’s haunting atmosphere and exploration of themes like isolation and family secrets make it a compelling read. For those interested in Gothic literature or psychological fiction, this book is a must-read; Its availability in PDF format ensures easy access, allowing readers to immerse themselves in Shirley Jackson’s masterful storytelling at their convenience.